IPv4
From $0.70 for 1 pc. 42 countries to choose from, rental period from 7 days.
IPv4
From $0.70 for 1 pc. 42 countries to choose from, rental period from 7 days.
IPv4
From $0.70 for 1 pc. 42 countries to choose from, rental period from 7 days.
IPv6
From $0.07 for 1 pc. 14 countries to choose from, rental period from 7 days.
ISP
From $1 for 1 pc. 24 countries to choose from, rental period from 7 days.
Mobile
From $14 for 1 pc. 15 countries to choose from, rental period from 2 days.
Resident
From $0.75 for 1 GB. 200+ countries to choose from, rental period from 30 days.
Use cases:
Use cases:
Tools:
Company:
About Us:
Scraper API is an open-source platform designed for automated web data extraction, effectively functioning as a scraping tool. It's a versatile system that allows the integration of custom scripts and collaborative project management.
A key feature of Scraper API is its cloud service API, enabling users to craft scripts tailored to specific websites. This makes it suitable for a wide range of services, including Facebook, LinkedIn, Google search results, Amazon marketplace, and others. Users can configure it to extract various types of data such as HTML documents, tables, text, images, and even information from .js files.
One challenge with web scraping using Scraper API is the potential triggering of anti-fraud systems. These are scripts employed by websites to prevent data scraping. They get activated when detecting numerous requests from the same IP or traffic from dubious sources, often resulting in a captcha verification page. To circumvent these anti-fraud measures and other related restrictions, setting up a proxy is essential prior to using Scraper API for your web scraping needs.
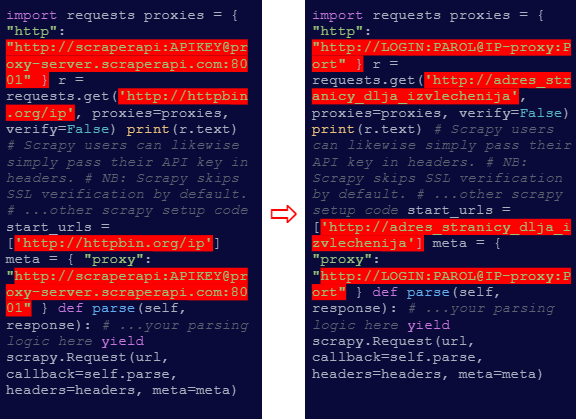
The Scraper API is compatible with various programming environments, including Bash shell for UNIX systems, JavaScript (Node), Python/Scrapy, PHP, Ruby, and Java. It offers a user-friendly way to configure your proxy, as detailed in these instructions.

ccurl -x "http://scraperapi:[email protected]:8001" -k "http://httpbin.org/ip"
curl -x "http://USERNAME:PASS@IP-proxy:Port" -k "http://webscrapingtarget"
Apply this method to integrate the proxy in scripts written in other programming languages as well.
For Python, the adapted command would follow a similar pattern. Here’s an example for Python:

Likewise, for Ruby, the request would be adjusted in a comparable way:

Setting up a proxy with the Scraper API is crucial for several reasons. It automates data collection while avoiding detection by anti-fraud systems, which are often triggered by multiple requests from a single IP. This minimizes the risk of triggering anti-bot protection and account blocks. Additionally, using a proxy facilitates access to region-restricted data, broadening the scope of your scraping capabilities.
