IPv4
From $0.70 for 1 pc. 40 countries to choose from, rental period from 7 days.
IPv4
From $0.70 for 1 pc. 40 countries to choose from, rental period from 7 days.
IPv4
From $0.70 for 1 pc. 40 countries to choose from, rental period from 7 days.
IPv6
From $0.07 for 1 pc. 14 countries to choose from, rental period from 7 days.
ISP
From $1.35 for 1 pc. 21 countries to choose from, rental period from 7 days.
Mobile
From $14 for 1 pc. 14 countries to choose from, rental period from 2 days.
Resident
From $0.90 for 1 GB. 200+ countries to choose from, rental period from 30 days.
 Armenia
 Australia
 Belgium
 Brazil
 Bulgaria
 Canada
 China
China
 Czech
Czech
 England
 Finland
 France
 Georgia
 Germany
 Hungary
 India
India
 Indonesia
 Ireland
 Italy
Italy
 Japan
Japan
 Kazakhstan
 Korea
Korea
 Latvia
 Lithuania
 Malaysia
 Mexico
 Netherlands
 Norway
 Poland
 Portugal
 Romania
 Russia
 Singapore
 South Africa
 Spain
Spain
 Sweden
 Switzerland
 Thailand
 Turkey
 Ukraine
 USA
USA
Use cases:
Armenia
Australia
Belgium
Brazil
Bulgaria
Canada
China
Czech
England
Finland
France
Georgia
Germany
Hungary
India
Indonesia
Ireland
Italy
Japan
Kazakhstan
Korea
Latvia
Lithuania
Malaysia
Mexico
Netherlands
Norway
Poland
Portugal
Romania
Russia
Singapore
South Africa
Spain
Sweden
Switzerland
Thailand
Turkey
Ukraine
USA
Use cases:
Tools:
Company:
About Us:
Armenia
Australia
Belgium
Brazil
Bulgaria
Canada
China
Czech
England
Finland
France
Georgia
Germany
Hungary
India
Indonesia
Ireland
Italy
Japan
Kazakhstan
Korea
Latvia
Lithuania
Malaysia
Mexico
Netherlands
Norway
Poland
Portugal
Romania
Russia
Singapore
South Africa
Spain
Sweden
Switzerland
Thailand
Turkey
Ukraine
USA
Are you in search of the right steps for Windows 11 proxy settings? There are many people who find it difficult to do it right. Thus, you need a solid approach that offers a guaranteed setup. Some benefits you can get by doing it are better online privacy, network performance, and access to restricted content.
So, whether you want the intermediary server for personal use, corporate reasons, troubleshooting connectivity issues, or more, managing the server correctly is the key. In this blog post, you can see the best ways in just a few minutes. So, let’s begin by getting into the proper server setup.
It is basically an intermediary server. It is helpful to route the internet traffic between a user’s device and the websites they visit. The process works by receiving requests from clients like a web browser. Next, it gets forwarded to the internet, and the requested data is returned to the client.
With the help of this setup, you can improve the security of your devices and manage the network traffic better. Besides, a server can cache recently viewed content. It is helpful for faster load times and to enforce access controls or content filtering.
Also, these servers are ideal for personal and enterprise Windows 11 proxy settings to properly monitor, restrict, or anonymize internet usage.
Here comes the main part. Now, every leading section will offer you ways to configure Windows 11 proxy settings. You can easily do the setup using manual and automatic methods. You will see both methods below for a seamless experience. So, let’s check them out!
The following steps are simple and offer you the best manual for Windows 11 proxy settings:
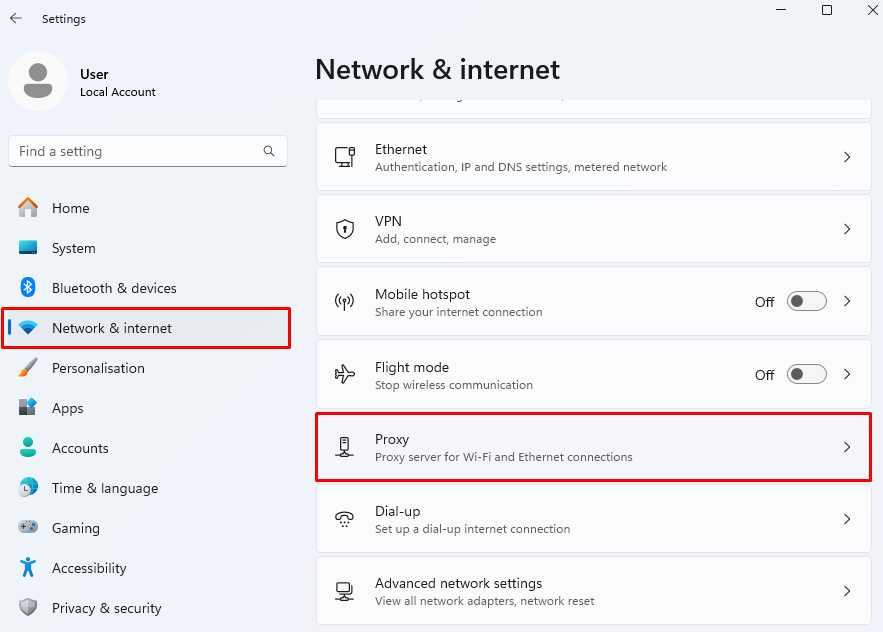
A user starts by clicking on the Windows menu. It is basically the Start Button on your device. Now, you need to search and select the Settings app. It will take you to the central control hub, where you can see all system preferences.

As you enter the next window, please see the left-hand sidebar. Here, you need to click on Network & Internet. When you get the expanded options, you select the Proxy section. This is the area that mainly manages all the server-related options. For example, both automatic and manual configurations.

In this setup, you go under the Manual proxy setup section. Here, you see the option with the label Use a proxy server. Please click the Set up button next to it. This will open a new window. In this new section, you enable and configure the specific server details. For example, the IP address and port number.

Now, it is time to enable the server. You will see a setup Window, and here you go to toggle the switch to On. By doing this, you instantly activate the manual server configuration. You must remember that if this switch stays off, your system will avoid any Windows 11 proxy settings that you enter. It will continue to use the direct internet connection.

In this step, you need to fill in the essential details. You will be requested to use the IP address and port number of the intermediary gateway that you want to use. Usually, these details are provided by the service provider. You need to ensure that you enter the correct details for a successful connection.

If you notice carefully, you will see an area below the IP and port field. Here, you can enter the URLs of websites that should bypass the gateway. It is helpful when you want to access trusted internal sites or services. You can separate multiple entries by using the semicolons.

After you enter all the required information, hit the Save button. It will be shown at the bottom of your setup window. By doing this, you get the confirmation that your changes are done and the gateway is activated. Now, your device will start routing the online traffic according to the configuration you’ve just defined.

Now, let’s check the steps for automatic setup:
The first step is similar to the manual approach. You need to click the Start menu. Now, select Settings.
Now, navigate the Network & Internet from the sidebar. The next thing you need to do is click on the Proxy tab.
You go to the automatic setup option on your screen. Under this option, you can see Automatically detect settings. Please toggle its switch to On.
This will allow your system to use the WPAD. It will help to identify any authorized intermediary gateway set by your network.

After learning both ways, you must know how to choose a proxy. The answer depends on your needs – whether you require it for personal, professional, or other specific purposes.
Besides the manual and automatic approaches, you can set Windows 11 proxy settings using the Control Panel. Let’s find out how.
Begin by clicking the Start button. Please type Control Panel. You will see the result with different options on your screen. But you need to choose the Control Panel app. This is a legacy interface that enables you to have more advanced configuration options.

Now, you need to move to Network and Internet. In this section, you will see various networking tools and options. It includes access to internet configuration options. In this section, you can change how your device connects to the internet. It doesn’t stop you here. You can also manage the connections and modify the Windows 11 proxy settings.

In this step, you need to click on the Internet Options link. It will lead to a new window that is responsible for managing the options for your internet connection, security, and browsing configuration.

When you move to the Internet Options window, you can see the Connections tab. It appears near the top. Now, click on the LAN Settings button. In this part, you configure the gateway choices specifically for your Local Area Network (LAN). It is basically useful for enterprise environments or for advanced personal configurations.

Here, please check the box that is labeled Use a proxy server for your LAN (These settings will not apply to dial-up or VPN connections). When you see it, click the Advanced button. It enables the users to specify gateway options for different protocols. You will get more granular control over your network routing with this.

Finally, fill in the necessary details for each connection type. For example, HTTP, HTTPS, FTP, and SOCKS. It depends on what your provider or network administrator has given you. After you fill in these fields, simply click on OK and then Save. Now, your device will route the traffic through the specified servers.

If you want to verify or check the Windows 11 proxy settings registry or operation, see whether an intermediary gateway is enabled under the manual or automatic option by following steps similar to configuring the gateway. If it shows you an address and port number, it means the intermediary server is active.
There are also alternative online ways to check Windows 11 proxy settings. For example, you can open your browser. Go to visit such “What is my IP” checker”. These types of tools can help you check if your IP address has been modified to match your gateway server.
Moreover, you can test the connectivity by pinging websites or simply checking access to restricted content. If you are using a private option, please ensure that your browser prompts you for credentials. Even deeper validations can be checked by using the Command Prompt.
Here's checking the ping on Windows:


Apart from the right setup, you must also learn what to do if Windows 11 proxy settings not working. The following list will help you to understand this:
The first one relates to entering the wrong IP or port. It can block internet access. So, please double-check with your provider and re-enter accurate details.
Paid servers usually require a username and password. You need to ensure that the credentials are correct and saved if prompted by your browser.
A common sign that the server might be offline is when the network stops functioning properly. Start by temporarily disabling the current connection route to see if access is restored. If that resolves the issue, it's likely the problem lies with the service you're using—free solutions often lead to instability or blocking. For a more reliable experience, consider switching to a trusted paid provider with better uptime and support.
When you are in a situation where both automatic and manual setups are enabled, it causes conflicts. So, please disable one to ensure smooth operation.
Network access may be restricted by your organization's or personal firewall. This can result in connection errors or timeouts. To resolve the issue, check with your network administrator to ensure the required ports and domains are not being blocked. You may also need to adjust your firewall preferences manually.
All in all, configuring an intermediary on such OS is not overly complicated if one pays attention to details. For simple HTTPS connections, manual configuration via the network preferences should suffice. On the other hand, working with SOCKS protocols or needing a finer degree of control over the intermediary is best accomplished through the LAN options or utilizing other programs. One also has to pick a reliable provider to avoid degraded connections and downtimes.
 Instagram
  Facebook
  TikTok
  Telegram
  YouTube
  Twitter
  Tinder
  Reddit
  LinkedIn
  Runescape
  Dofus
Dofus  Metin2
  Silkroad
  Margonem
  Lineage 2
  WoW
WoW  Lords Mobile
  Travian
  Steam
Steam  Origin
  Google
  ScrapeBox
  Amazon
  Ebay
Ebay  Shopify
  Etsy
Etsy  PayPal
  Netflix
  Spotify
  Twitch
  Browsing