IPv4
From $0.70 for 1 pc. 41 countries to choose from, rental period from 7 days.
IPv4
From $0.70 for 1 pc. 41 countries to choose from, rental period from 7 days.
IPv4
From $0.70 for 1 pc. 41 countries to choose from, rental period from 7 days.
IPv6
From $0.07 for 1 pc. 14 countries to choose from, rental period from 7 days.
ISP
From $1.35 for 1 pc. 23 countries to choose from, rental period from 7 days.
Mobile
From $14 for 1 pc. 14 countries to choose from, rental period from 2 days.
Resident
From $0.90 for 1 GB. 200+ countries to choose from, rental period from 30 days.
Use cases:
Use cases:
Tools:
Company:
About Us:
Brave Browser is marketed by its developers as one of the most secure and private browsers available. It features a built-in firewall, ad blocker, and tracker blocker. The application even supports TOR networks and VPN natively.
In practice, however, using a TOR connection can significantly slow down internet traffic. This method is typically only justified in exceptional situations where accessing blocked resources might lead to legal implications. As for the VPN service, it is a paid feature with a monthly subscription costing $9.99. Given these aspects, in terms of versatility, ease of use, and cost-effectiveness, a browser proxy remains an unmatched alternative.
For information on how to use a proxy in Brave Browser and whether third-party plugins are necessary, refer to our step-by-step guide.
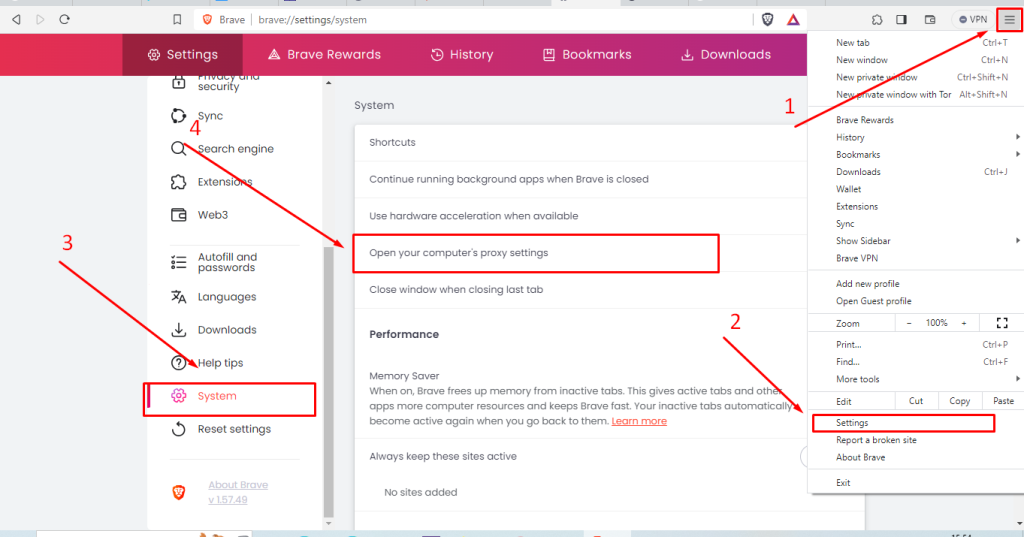
In Brave Browser, regardless of whether it's a version for Mac, Linux, or Windows, there isn't a built-in client for proxy configurations. Instead, the application relies on a proxy server set up at the system level. This design choice was made intentionally to avoid overloading the software and, more specifically, to conserve RAM usage, thereby maintaining the application's high speed.
Brave Browser supports SOCKS proxy, which is versatile enough for not only HTTP requests but also for file sharing, torrent networks, and video communications. This flexibility allows users to install a universal server that can be utilized across all applications.


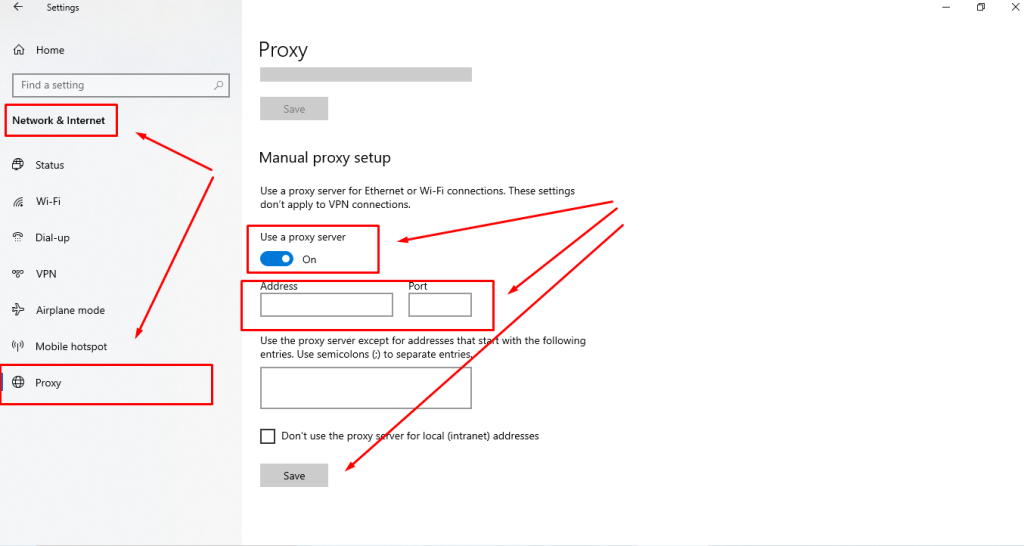
Once complete, this setup process is similar across other operating systems. After selecting the proxy settings link in the browser, you will be redirected to the system settings where you need to input the IP address, port, and save your preferences.
