IPv4
From $0.70 for 1 pc. 48 countries to choose from, rental period from 7 days.
Node.js is a JavaScript runtime built on the V8 engine, the same engine used in the Google Chrome browser. It enables the execution of JavaScript on the server side, extending beyond the browser to provide a runtime environment for building high-performance, scalable web applications. Node.js allows developers to write server-side code in JavaScript, facilitating the development of applications with shared code between the client and server sides.
Key features of Node.js include asynchronous I/O, an event-driven architecture, and multithreading through the event loop. These features make Node.js particularly efficient at handling numerous simultaneous connections, making it ideal for real-time web applications such as chat platforms, games, and streaming services.
Using proxy servers in Node.js is advantageous for:
Node.js supports integration of various proxy servers, including HTTP/HTTPS and SOCKS. Configuring a proxy server in Node.js allows for the safe bypassing of restrictions, testing, and website scraping.
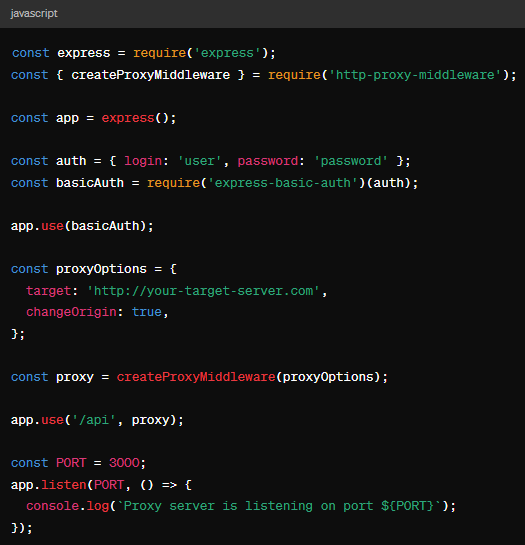
To set up an authenticated proxy in Node.js, you can use the “http-proxy-middleware” module, which simplifies the process of adding middleware to handle requests. Additionally, the Express web application framework is needed to create the main web server and build the backend. Here's a step-by-step guide to the setup:


Now the authenticated proxy server will be accessible at “http://localhost:3000”. When accessing any endpoint starting with “/api”, the request will be proxified to the target server with authorization. If the configuration is correct, a response will be received from the target server. If access is attempted without correct authorization, a 401 Unauthorized error page will be displayed.
The proxy configuration in Node.js is complete, and traffic is encrypted using the specified proxy. This setup allows developers to implement more techniques for bypassing blocks and enhancing network security.