IPv4
From $0.70 for 1 pc. 48 countries to choose from, rental period from 7 days.
IPv4
From $0.70 for 1 pc. 48 countries to choose from, rental period from 7 days.
IPv4
From $0.70 for 1 pc. 48 countries to choose from, rental period from 7 days.
IPv6
From $0.07 for 1 pc. 14 countries to choose from, rental period from 7 days.
ISP
From $0.85 for 1 pc. 21 countries to choose from, rental period from 7 days.
Mobile
From $9 for 1 pc. 19 countries to choose from, rental period from 2 days.
Resident
From $2 for 1 GB. 200+ countries to choose from, rental period from 30 days.
 Armenia
 Australia
 Belarus
 Belgium
 Brazil
 Bulgaria
 Canada
 China
China
 Cyprus
 Czech
Czech
 Denmark
 England
 Finland
 France
 Georgia
 Germany
 Greece
 Hungary
 India
India
 Indonesia
 Ireland
 Israel
 Italy
Italy
 Japan
Japan
 Kazakhstan
 Korea
Korea
 Latvia
 Lithuania
 Malaysia
 Malta
Malta
 Mexico
 Netherlands
 Nigeria
 Norway
 Poland
 Portugal
 Romania
 Russia
 Singapore
 South Africa
 Spain
Spain
 Sweden
 Switzerland
 Taiwan
 Thailand
 Turkey
 Ukraine
 USA
USA
Use cases:
Armenia
Australia
Belarus
Belgium
Brazil
Bulgaria
Canada
China
Cyprus
Czech
Denmark
England
Finland
France
Georgia
Germany
Greece
Hungary
India
Indonesia
Ireland
Israel
Italy
Japan
Kazakhstan
Korea
Latvia
Lithuania
Malaysia
Malta
Mexico
Netherlands
Nigeria
Norway
Poland
Portugal
Romania
Russia
Singapore
South Africa
Spain
Sweden
Switzerland
Taiwan
Thailand
Turkey
Ukraine
USA
Use cases:
Tools:
Company:
About Us:
Armenia
Australia
Belarus
Belgium
Brazil
Bulgaria
Canada
China
Cyprus
Czech
Denmark
England
Finland
France
Georgia
Germany
Greece
Hungary
India
Indonesia
Ireland
Israel
Italy
Japan
Kazakhstan
Korea
Latvia
Lithuania
Malaysia
Malta
Mexico
Netherlands
Nigeria
Norway
Poland
Portugal
Romania
Russia
Singapore
South Africa
Spain
Sweden
Switzerland
Taiwan
Thailand
Turkey
Ukraine
USA
The proxy must be of high quality and reliable. Give preference to paid personal proxies - this way you will get the maximum level of protection, which cannot be said about free or shared servers. On the contrary, they can harm your device.


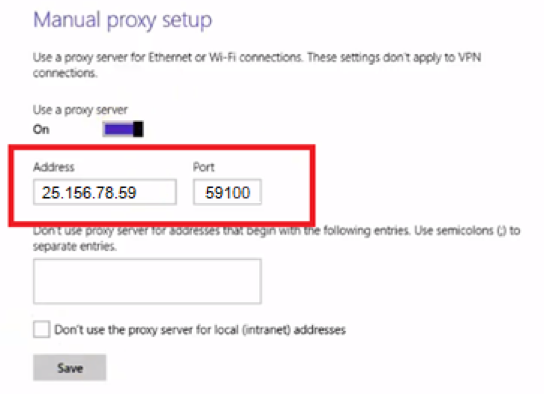


You can disable the proxy in the same way. You will need to go back to the "Proxy" section and next to "Manual proxy setup" move the slider to Off mode. Don't forget to save changes.


You can check if the proxy server settings are configured correctly through any browser. To do this, type in the search bar "My IP address" or "What is my IP address" and select any site that you like. If the IP on the site and the IP of your proxy match, then the configuration was successful!
 Instagram
  Facebook
  TikTok
  Telegram
  YouTube
  Twitter
  Tinder
  Reddit
  LinkedIn
  Runescape
  Dofus
Dofus  Metin2
  Silkroad
  Margonem
  Lineage 2
  WoW
WoW  Lords Mobile
  Travian
  Steam
Steam  Origin
  Google
  ScrapeBox
  Sports Betting
  Casino
  Bet365
  Amazon
  Ebay
Ebay  Crypto
  Shopify
  Etsy
Etsy  PayPal
  Netflix
  Spotify
  Twitch
  Browsing


